Automate Google Business Profile Reviews in Zapier with AI and Human Approval
Responding to Google Business reviews is crucial for customer engagement, local SEO, and brand reputation. However, manually crafting responses is time-consuming, and fully automated AI responses risk posting mistakes publicly - like misreading complaint severity, hallucinating policies, or responding in the wrong tone.
This guide shows you how to build an automation that:
- Automatically generates AI-powered responses to new reviews
- Routes responses through a human approval workflow
- Posts approved responses back to Google Business Profile
This gives you the time-saving benefits of automated drafts with human oversight to catch issues before they go public.
Video Walkthrough
Section titled “Video Walkthrough”Watch this video to see the complete setup process in action, or follow the step-by-step guide below.
How It Works
Section titled “How It Works”This automation requires two Zaps working together:
Zap 1: Generate and Submit for Approval
- Triggers when a new review is posted to your Google Business Profile
- Uses AI to generate a response based on the review
- Creates a Human-in-the-Loop task for review and approval
- Sends an email notification with the review link
Zap 2: Post Approved Responses
- Triggers when a Human-in-the-Loop task is reviewed
- Filters to only process approved responses
- Posts the approved response to Google Business Profile
Prerequisites
Section titled “Prerequisites”Before you begin, ensure you have:
- A free API key from EnforcedFlow (sign up here)
- Google Business Profile connected to your Zapier account
Part 1: Building the Review Response Generator (Zap 1)
Section titled “Part 1: Building the Review Response Generator (Zap 1)”Step 1: Set Up the Google Business Profile Trigger
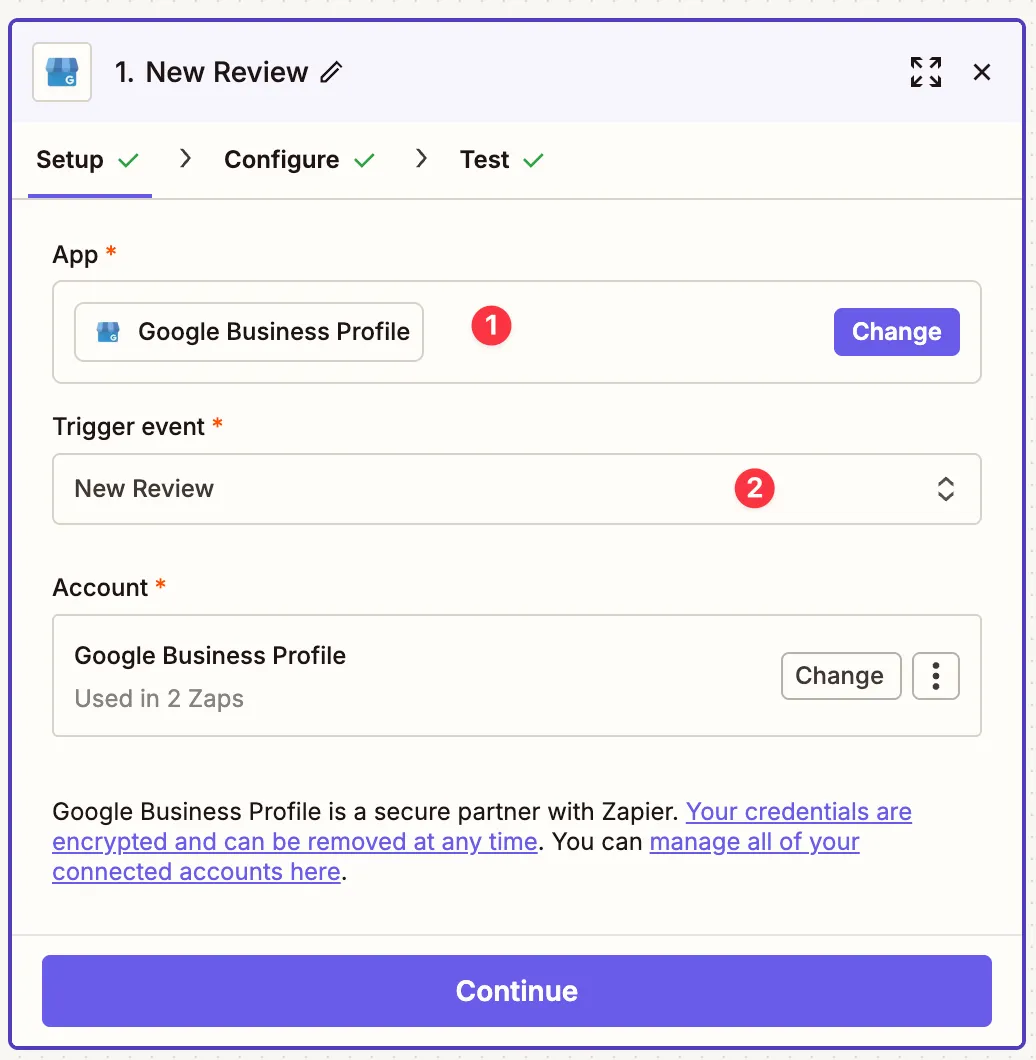
Section titled “Step 1: Set Up the Google Business Profile Trigger”Create a new Zap and select Google Business Profile as your trigger app.
Choose New Review as the trigger event. This will fire whenever someone leaves a review on your Google Business Profile.
Configuration:
- App: Google Business Profile
- Trigger event: New Review
- Account: Connect your Google Business Profile account
Test the trigger to ensure it’s working correctly and pulling in review data.
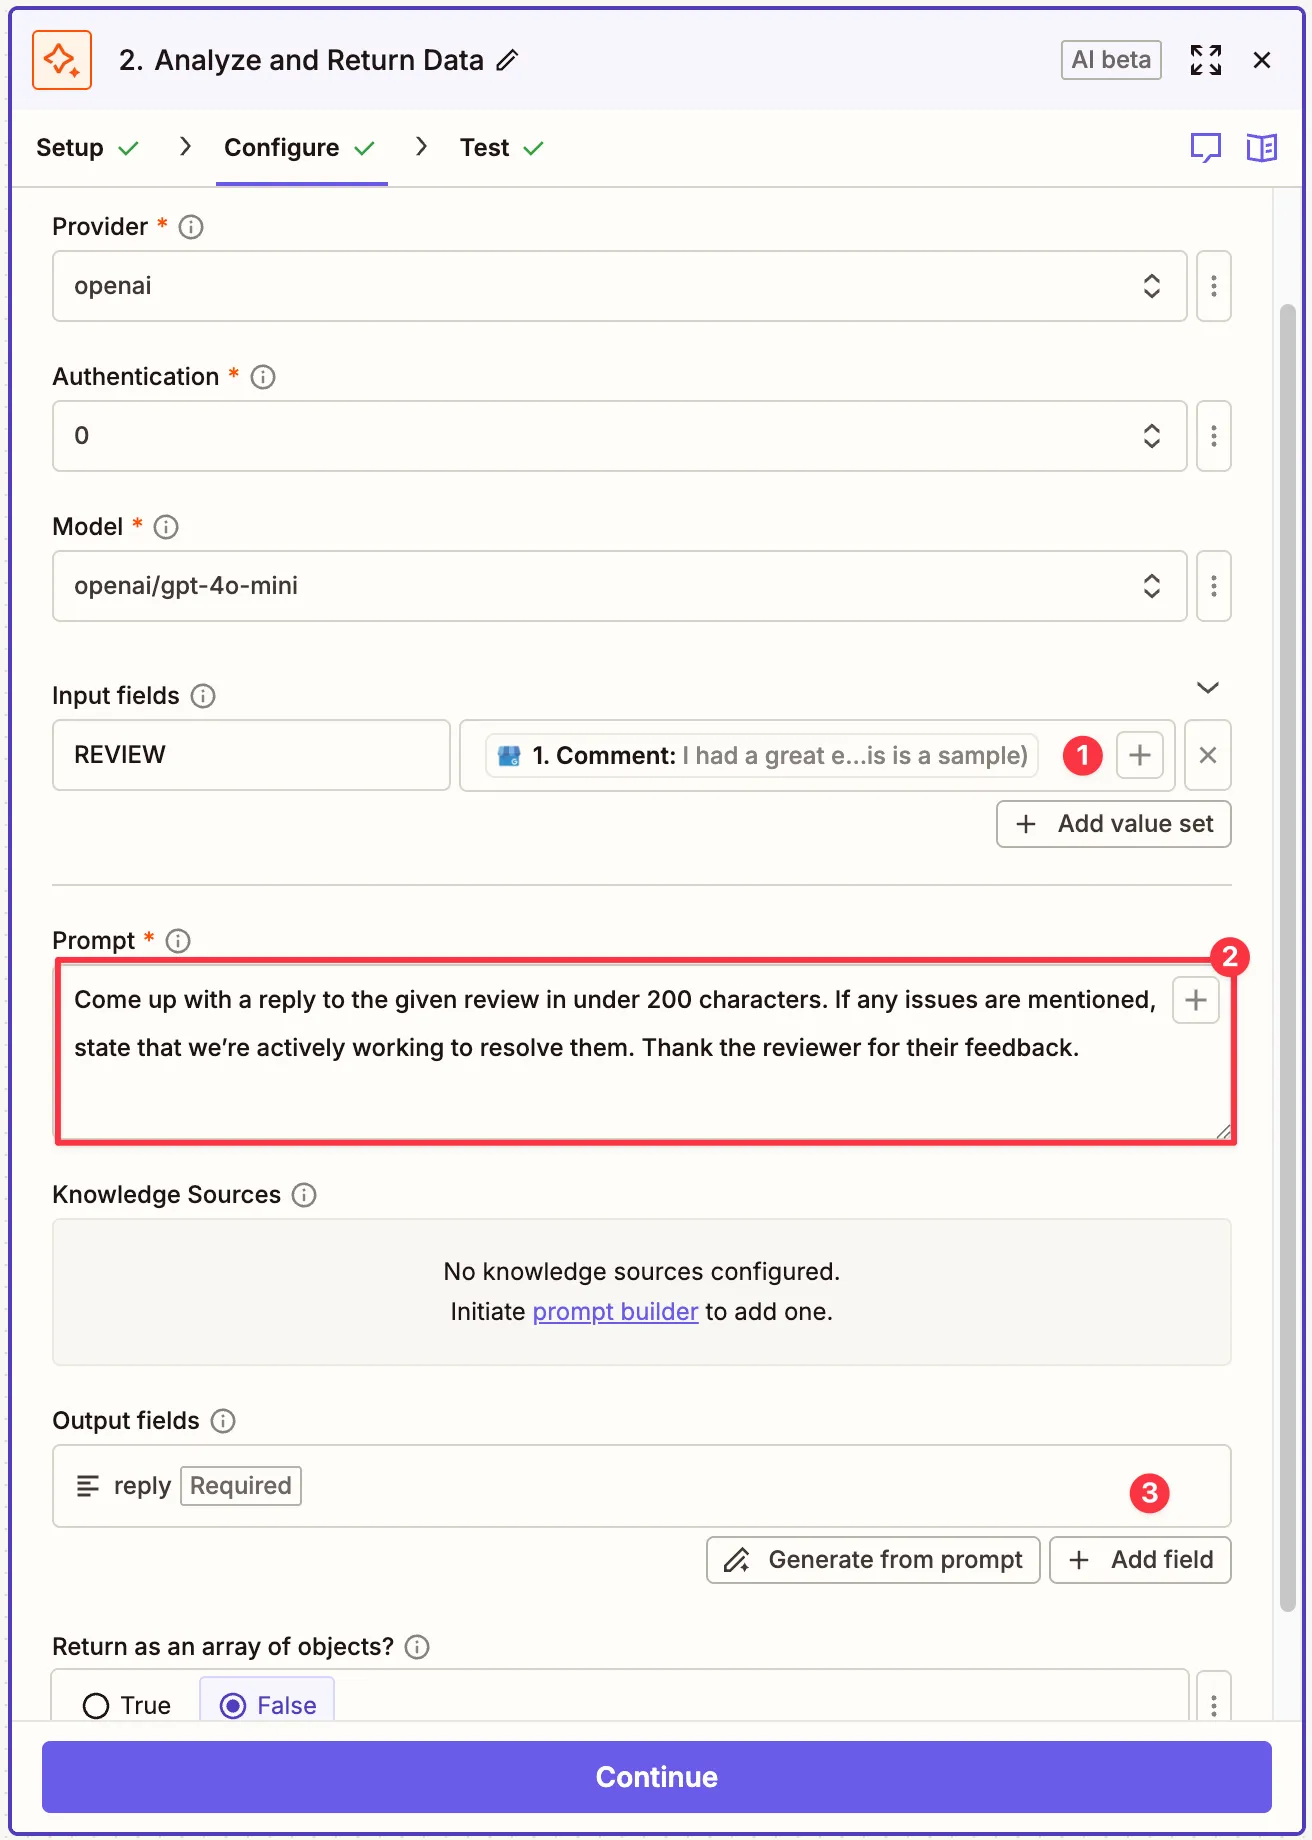
Step 2: Configure AI Response Generation
Section titled “Step 2: Configure AI Response Generation”Add AI by Zapier as your next action step.
Select Analyze and Return Data as the action event.
Configuration:
- Provider: OpenAI
- Model: openai/gpt-4o-mini (cost-effective and fast)
- Input fields: Map the review comment from Step 1
- Prompt: Craft instructions for generating responses
Example prompt:
Come up with a reply to the given review in under 200 characters.If any issues are mentioned, state that we're actively working toresolve them. Thank the reviewer for their feedback.- Output fields: Create a field called “reply”
- Return as array: Set to False
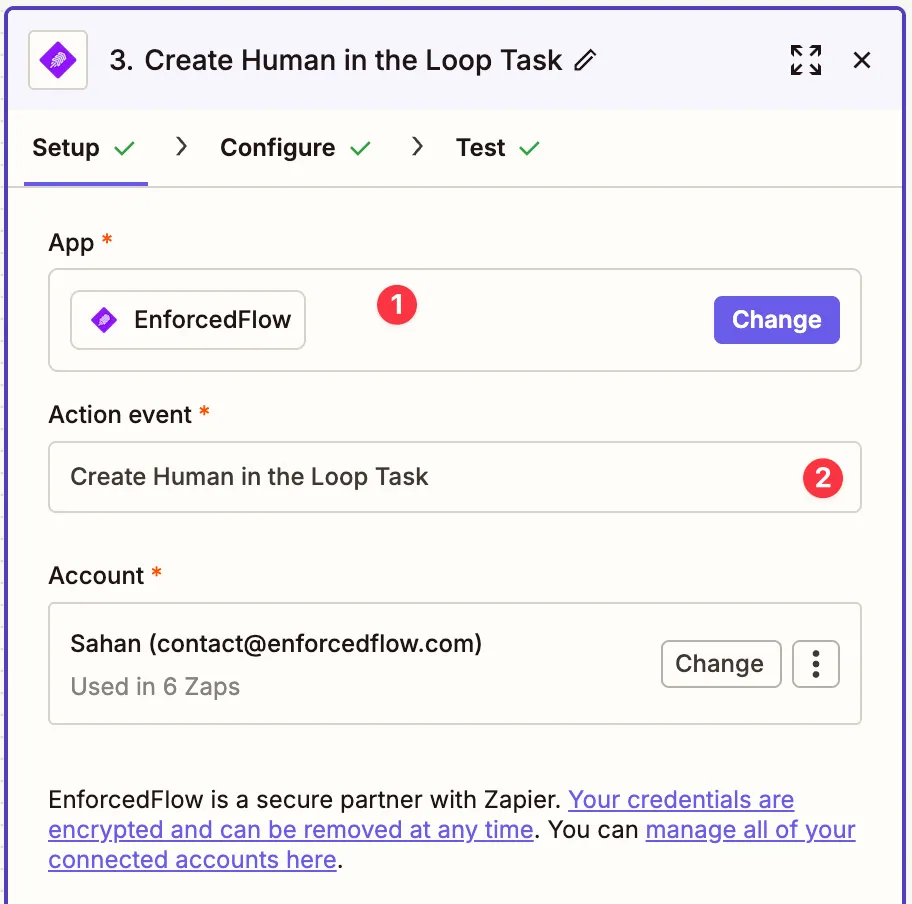
Step 3: Create Human-in-the-Loop Task
Section titled “Step 3: Create Human-in-the-Loop Task”Add EnforcedFlow as your next action step.
Select Create Human in the Loop Task as the action event.
Connect your EnforcedFlow account when prompted.

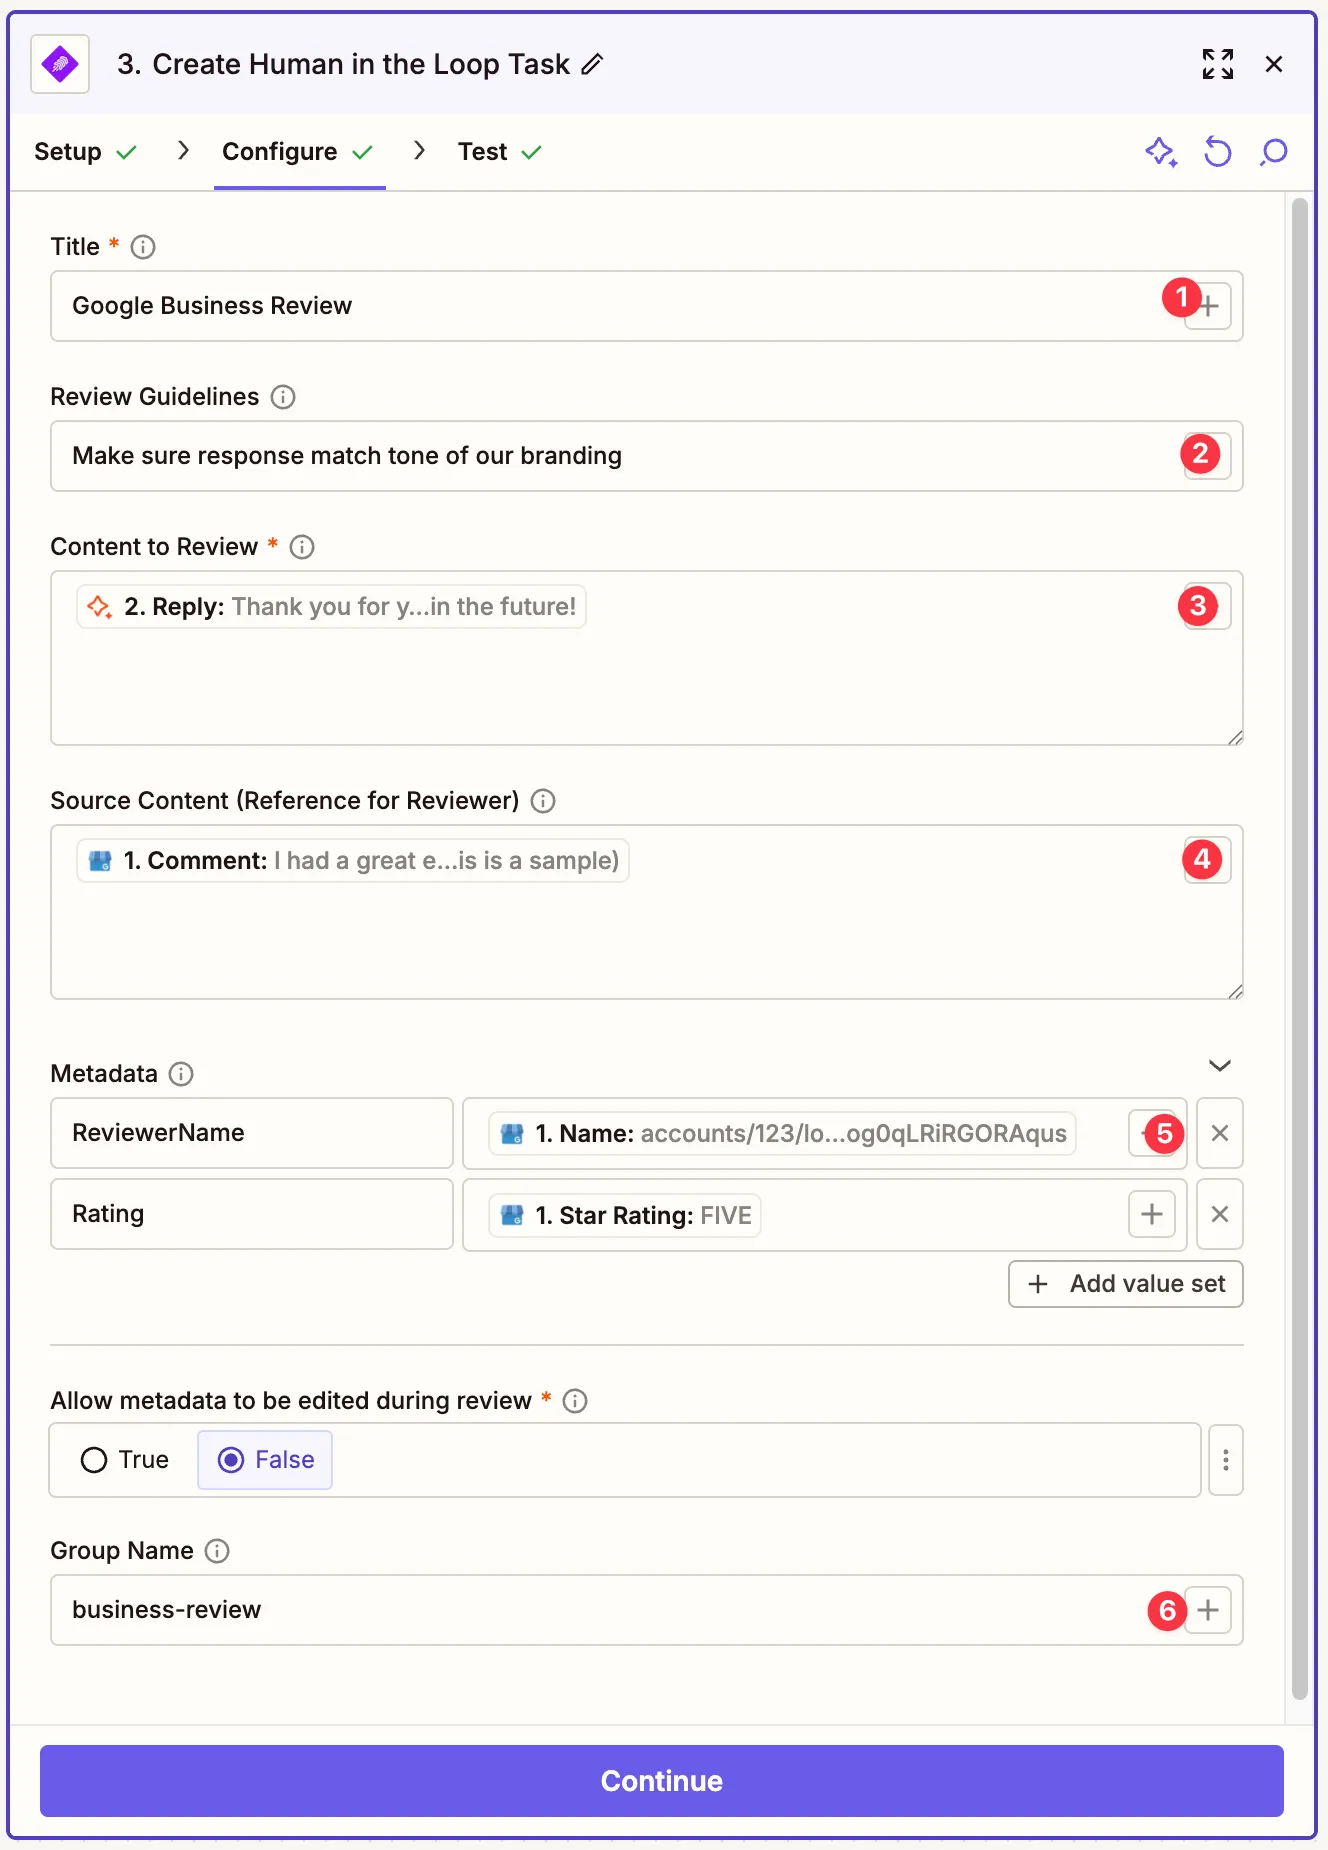
Configure the review task:
-
Title: “Google Business Review”
- This appears at the top of the review interface
-
Review Guidelines: “Make sure response match tone of our branding”
- Gives reviewers context on what to check
-
Content to Review: Map the AI-generated reply from Step 2
- This is what the reviewer can edit and approve
-
Source Content (Reference for Reviewer): Map the original review comment
- Provides context so reviewers understand what they’re responding to
-
Metadata: Add these key-value pairs:
- ReviewerName: Map the reviewer’s name from Step 1
- Rating: Map the star rating from Step 1
- This data passes through and will be available in Zap 2
-
Allow metadata to be edited: Set to False
-
Group Name: “business-review”
- Critical! This connects Zap 1 to Zap 2
Why Group Name Matters:
The Group Name acts as a unique identifier that links your two Zaps together. When Zap 2’s trigger listens for reviewed tasks, it will ONLY pick up tasks from this group. This prevents cross-contamination if you have multiple review workflows.
Additionally, grouping lets you review all pending tasks for this group at once - so you can approve multiple review responses in a single session instead of handling them one by one, saving significant time.
Run Test to verify the step is working. This will return a review URL as shown in the screenshot.
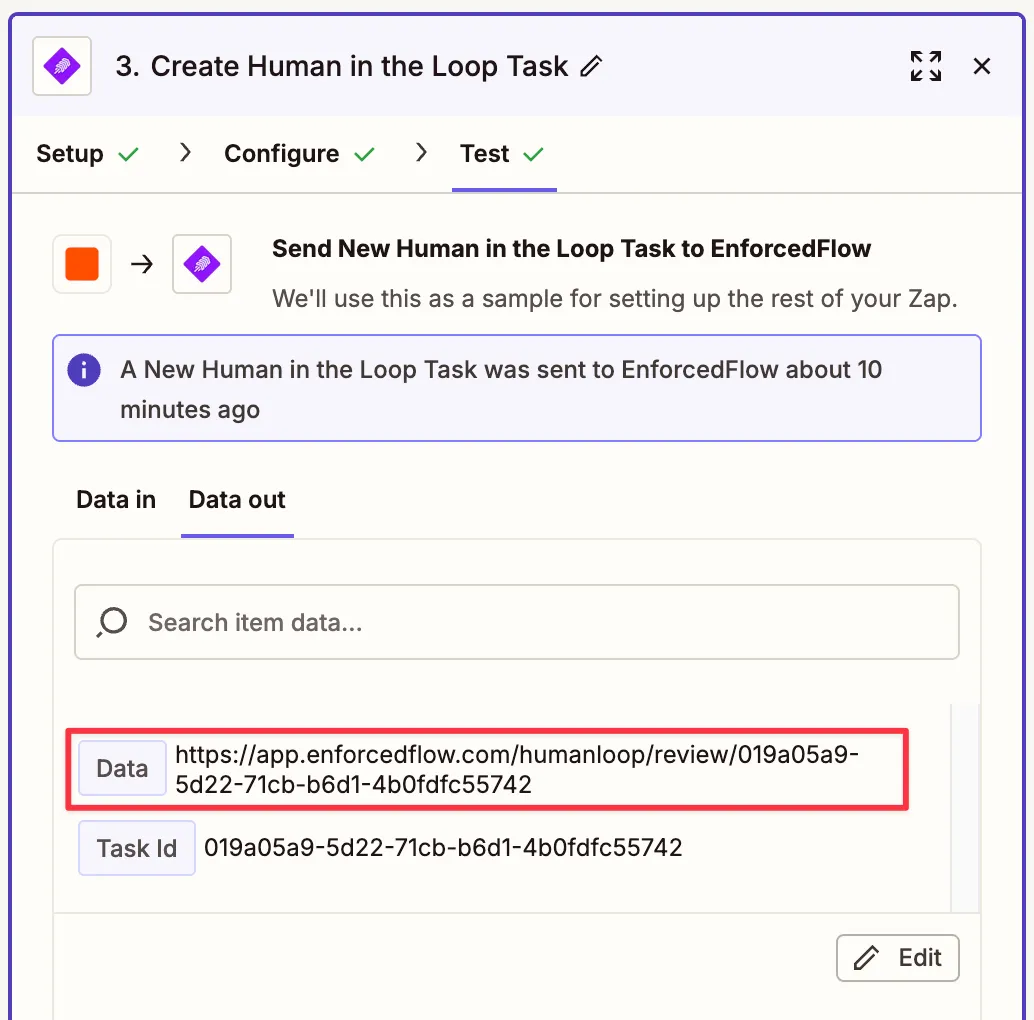
What you’ll see when you open the review URL:
When you click the review URL from the test output, you’ll see a clean, focused interface showing:
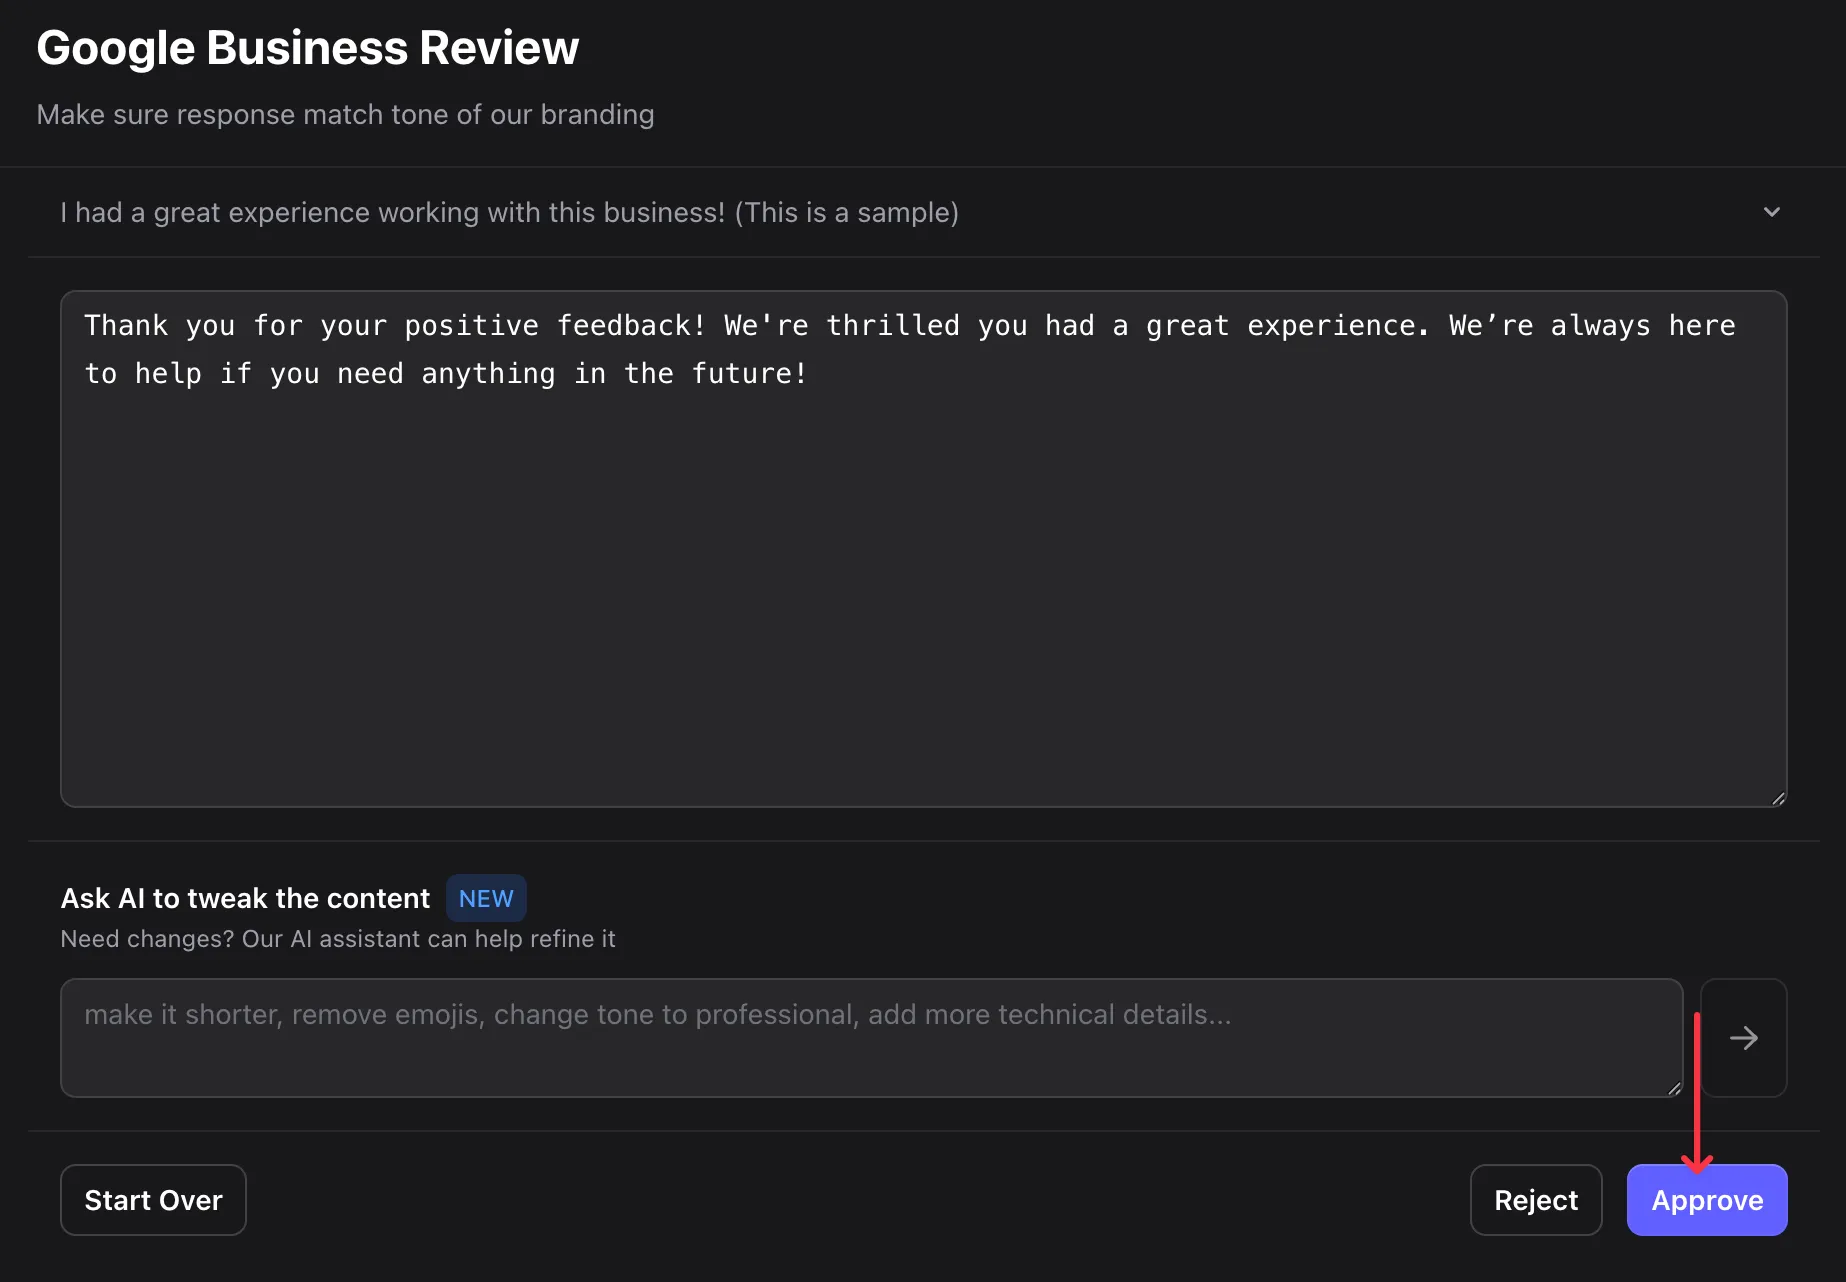
- The title and guidelines you configured
- The original review for context
- The AI-generated response (fully editable)
- An AI assistant to quickly refine the content
- Action buttons: Start Over, Reject, or Approve
Using the AI Refinement Feature:
Instead of manually editing, you can use the “Ask AI to tweak the content” feature to quickly adjust the response. For example:
- “Make it shorter”
- “Add more enthusiasm”
- “Change tone to professional”
- “Remove emojis”
**For t
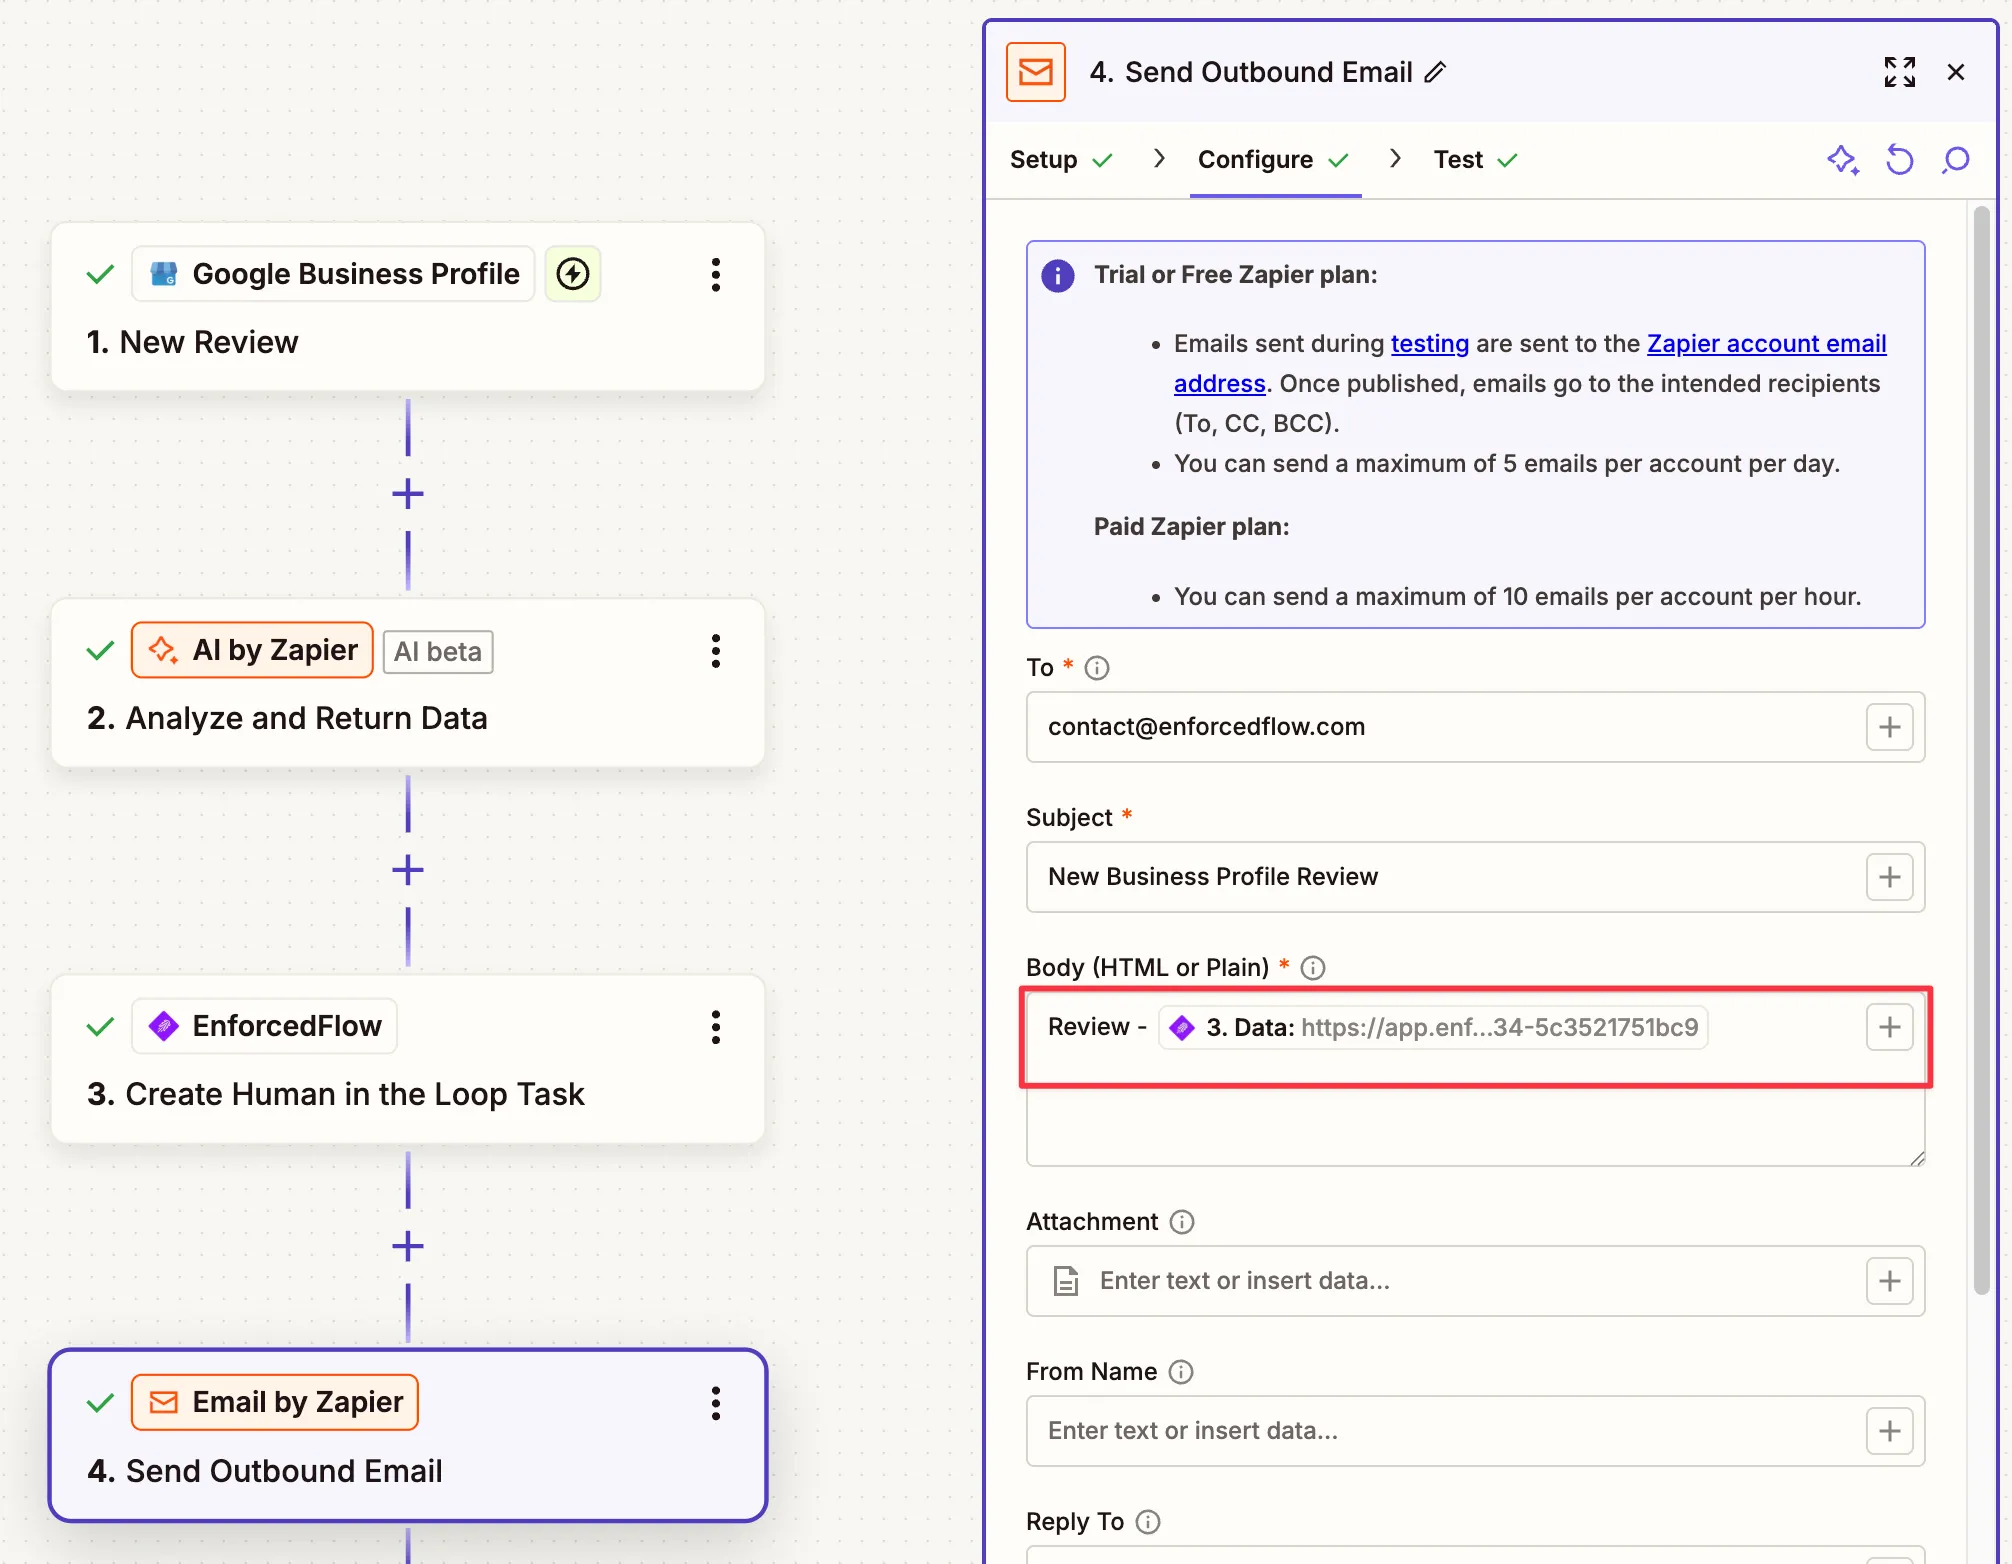
Step 4: Send Review Link to Approver
Section titled “Step 4: Send Review Link to Approver”Add Email by Zapier as your final action step.
Select Send Outbound Email as the action event.
Configure the email:
- To: Enter the email address(es) of your reviewer(s)
- Subject: “New Business Profile Review”
- Body: Include the review link from Step 3
Alternative notification methods:
- Send to Slack instead of email
- Create a task in ClickUp or Asana
- Add to a shared Google Sheet
Your Complete Zap 1 Should Look Like This:
Section titled “Your Complete Zap 1 Should Look Like This:”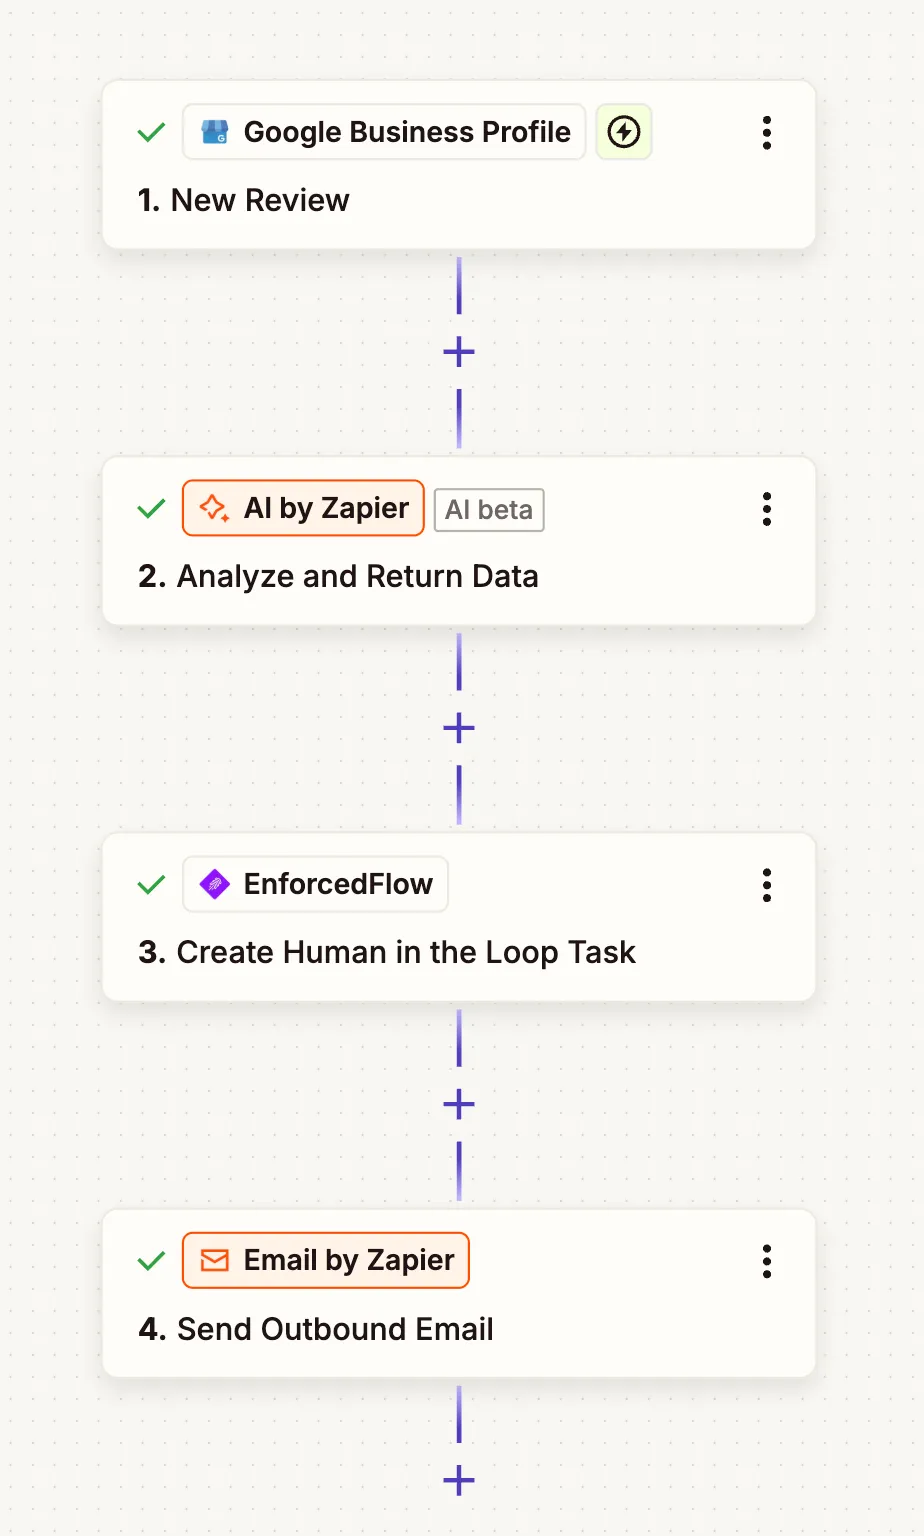
- Google Business Profile - New Review
- AI by Zapier - Analyze and Return Data
- EnforcedFlow - Create Human in the Loop Task
- Email by Zapier - Send Outbound Email
Before turning on Zap 1: Make sure you’ve approved the test review task from Step 3. This sample data is necessary for setting up Zap 2 in the next section.
Turn on your Zap once you’ve tested it successfully.
Part 2: Building the Response Posting Automation (Zap 2)
Section titled “Part 2: Building the Response Posting Automation (Zap 2)”Now we’ll create the second Zap that listens for approved reviews and posts them to Google Business Profile.
Step 1: Set Up EnforcedFlow Trigger
Section titled “Step 1: Set Up EnforcedFlow Trigger”Create a new Zap and select EnforcedFlow as your trigger app.
Choose Human in Loop Task Reviewed as the trigger event.
Connect your EnforcedFlow account (same account as Zap 1).
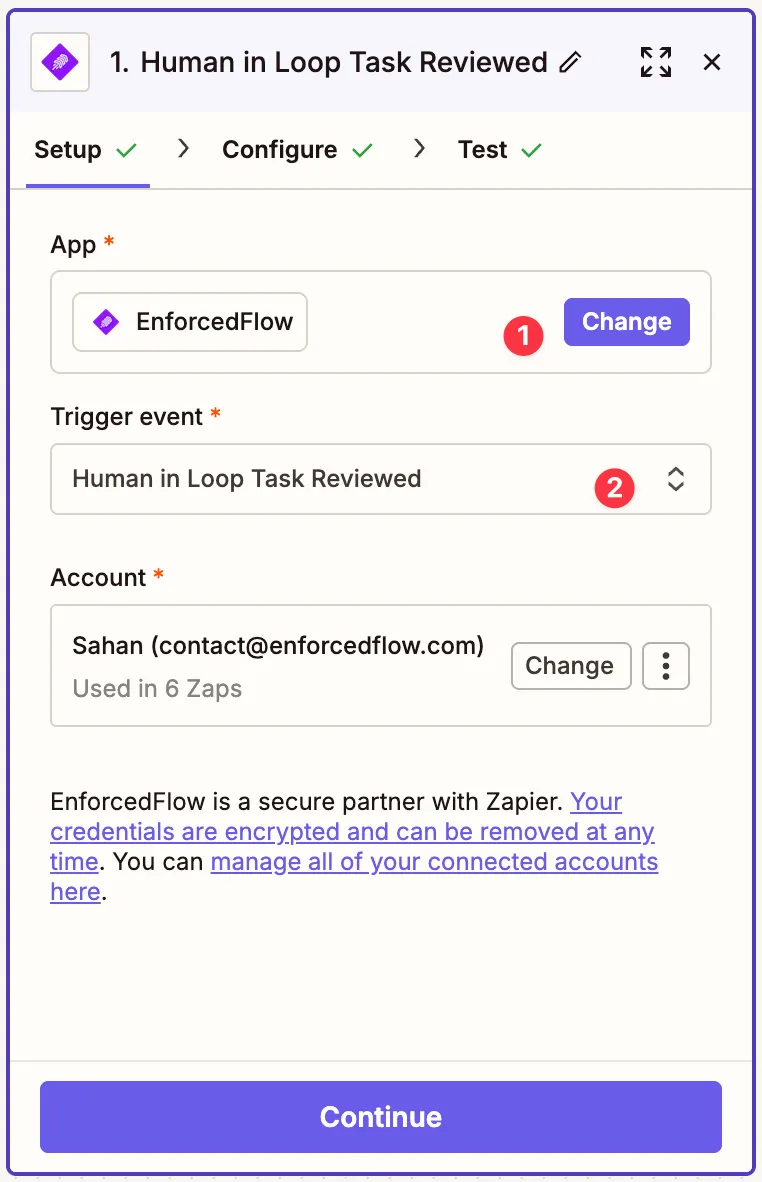
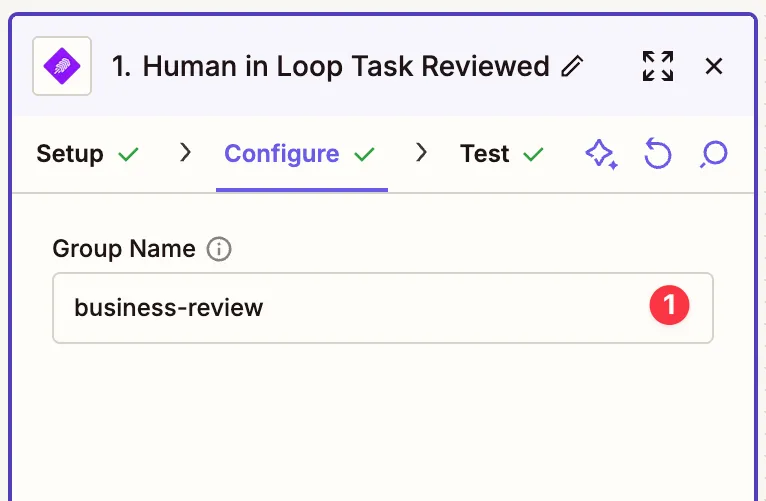
Configure the trigger:
Group Name: “business-review”
This MUST match exactly what you used in Zap 1, Step 3. This ensures this Zap only processes Google Business review tasks, not other types of tasks you might have.
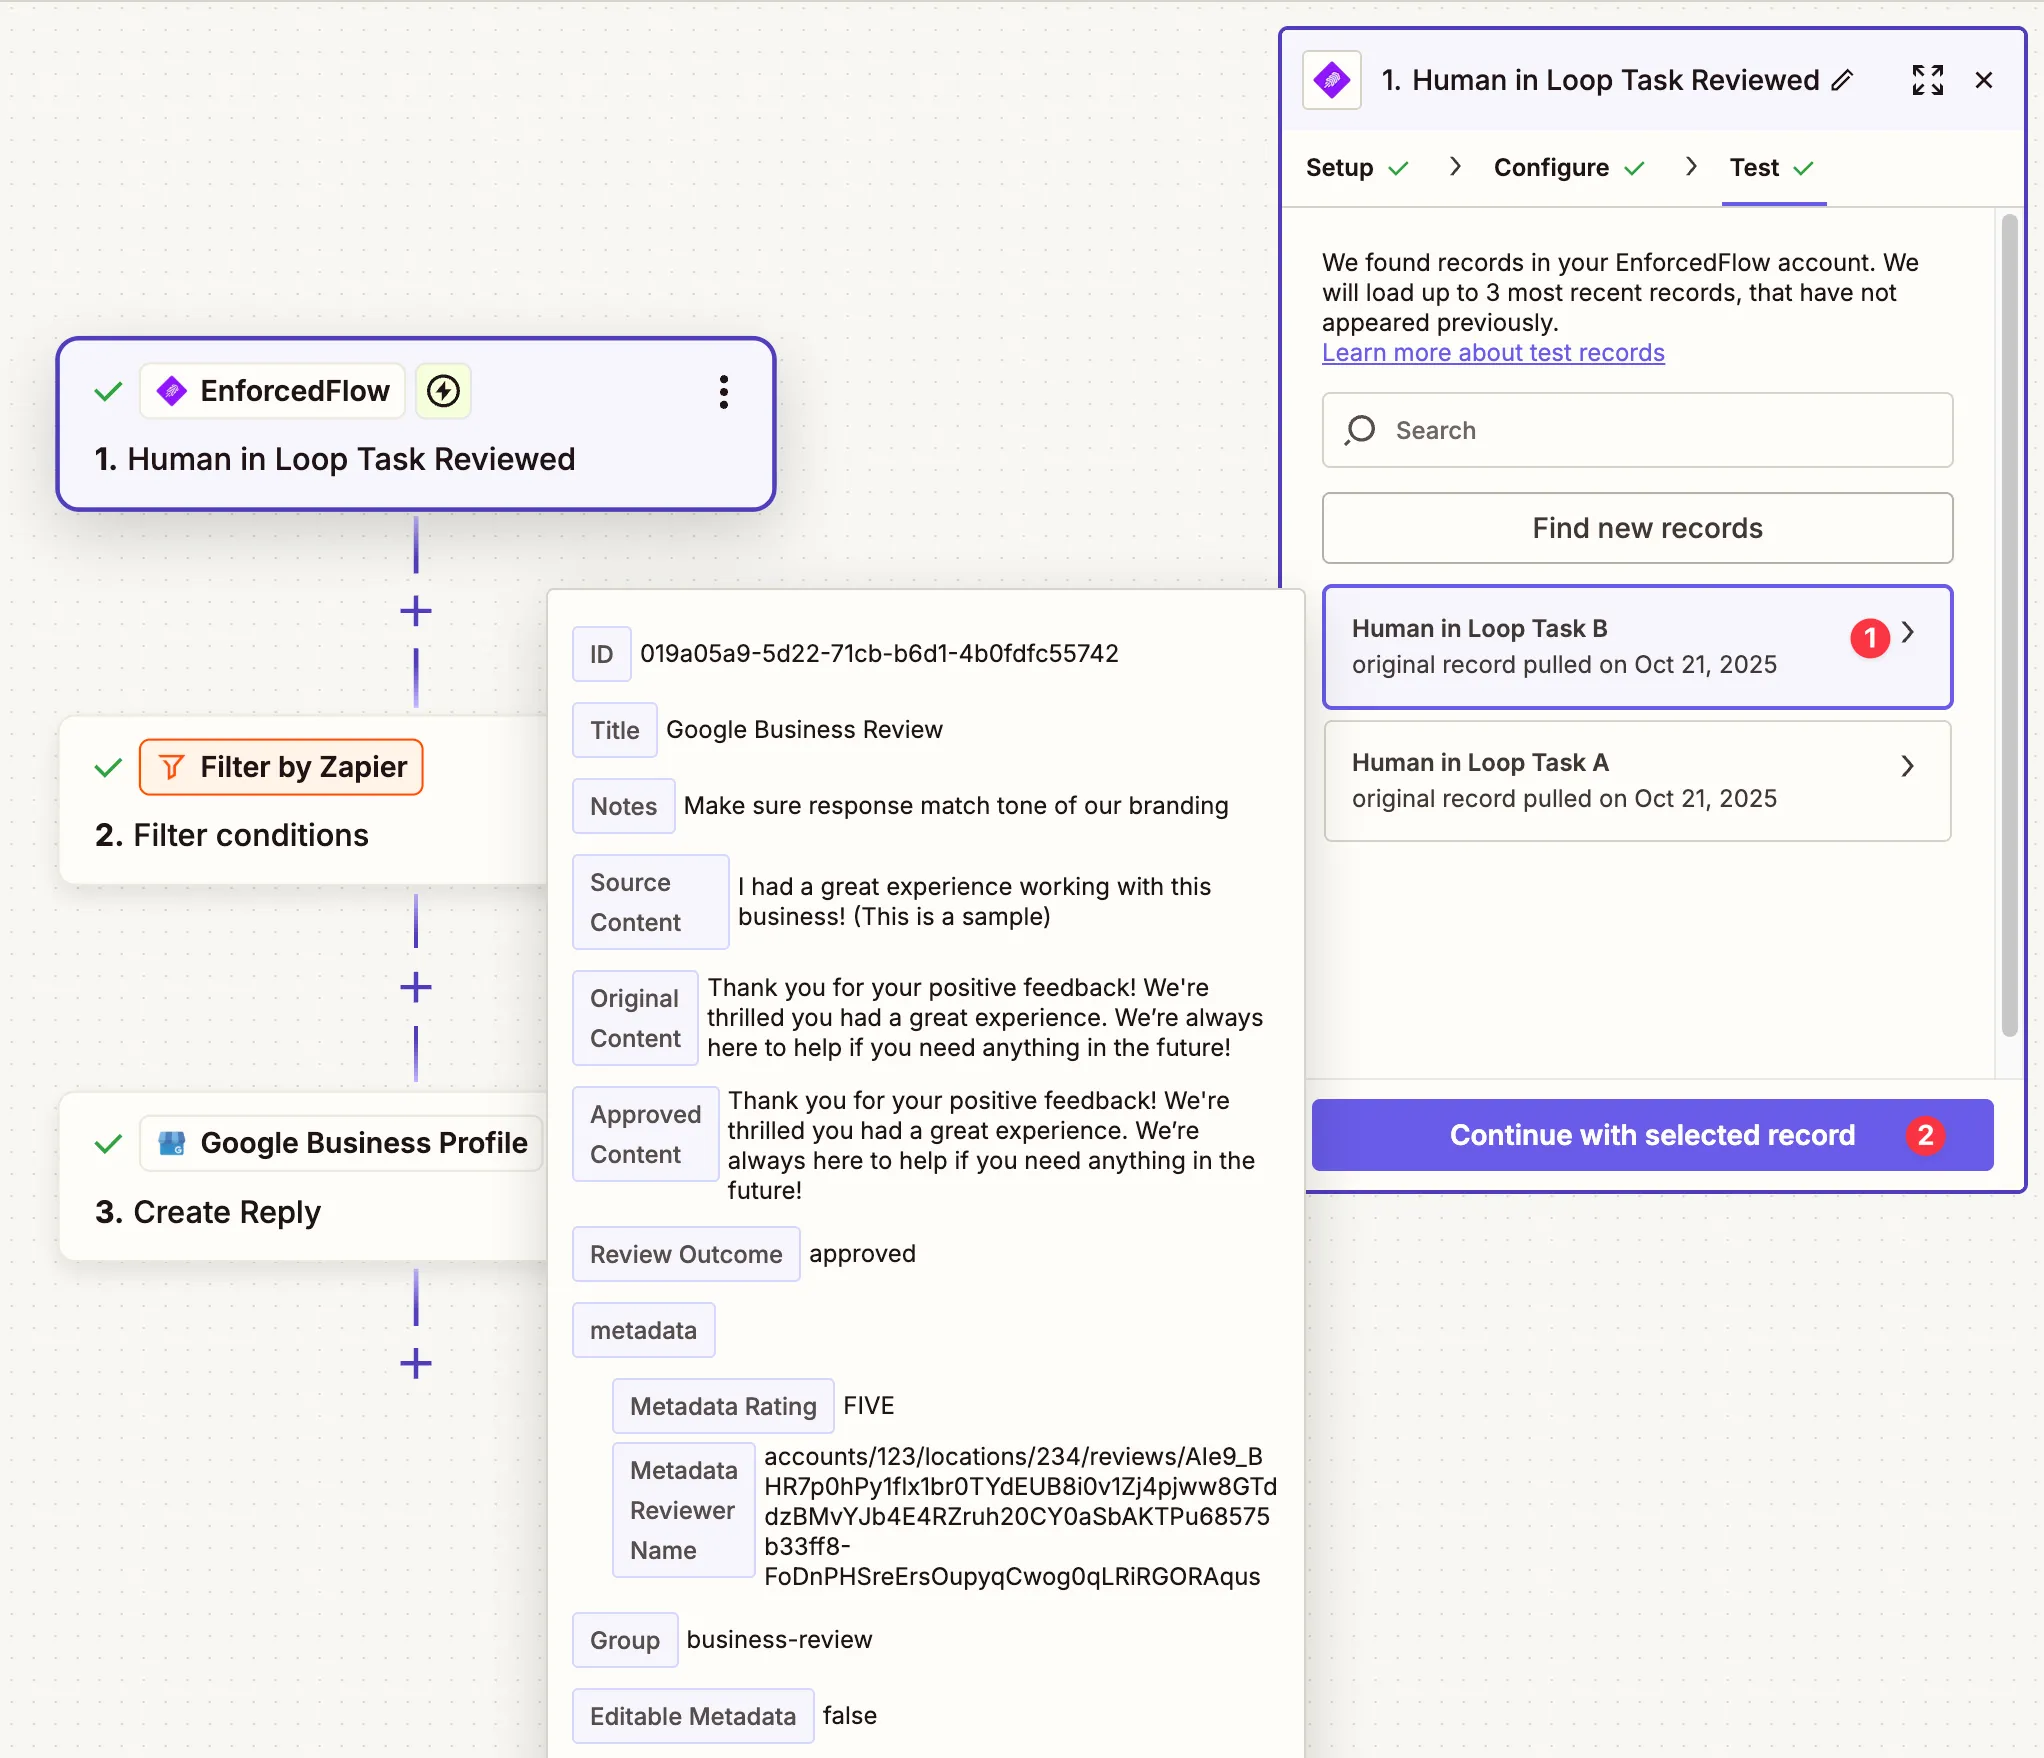
Test the trigger to pull in a sample reviewed task.
Note: This should pull in the sample task you approved when testing Zap 1, Step 3. If no data appears, go back to Zap 1, run the test again, and approve the task.
The trigger will return rich data including:
- ID: Task identifier
- Title: “Google Business Review”
- Notes: Your review guidelines
- Source Content: The original review
- Original Content: The AI’s initial response
- Approved Content: The final approved response (this is what we’ll post!)
- Review Outcome: “approved” or “rejected”
- Metadata: ReviewerName, Rating, and other data you passed through
This data gives you everything you need to post the response.
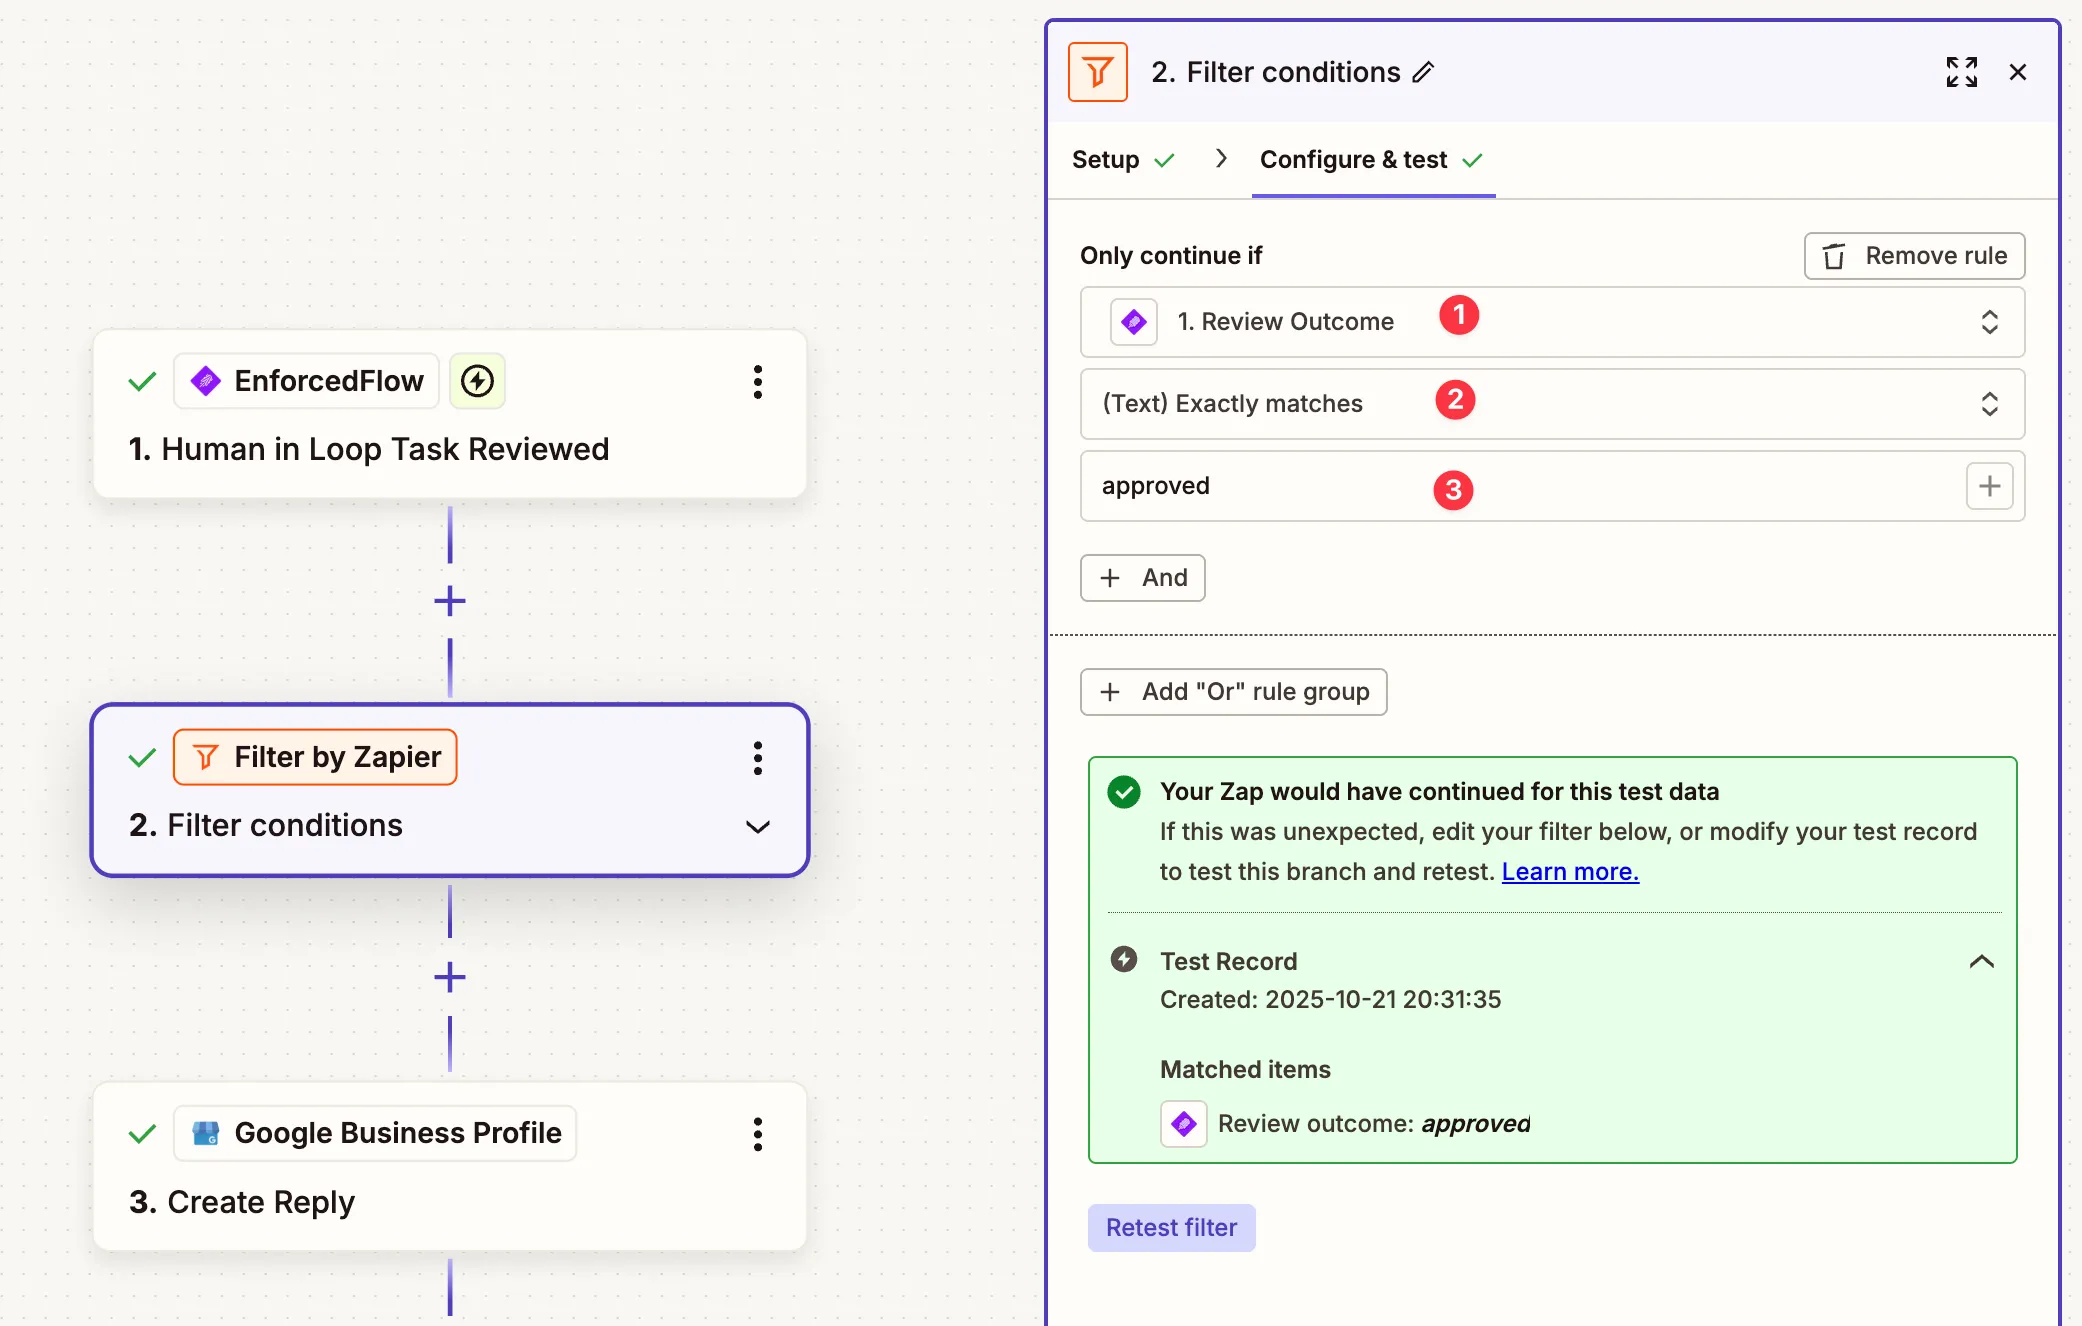
Step 2: Filter for Approved Responses Only
Section titled “Step 2: Filter for Approved Responses Only”Add a Filter by Zapier step.
Configure the filter:
Only continue if:
- Field:
1. Review Outcome - Condition:
(Text) Exactly matches - Value:
approved
This ensures rejected reviews don’t get posted. You could also create a separate automation to handle rejections (e.g., notify a manager or create a follow-up task).
Test the filter to ensure it passes with “approved” outcomes.
Step 3: Post Response to Google Business Profile
Section titled “Step 3: Post Response to Google Business Profile”Add Google Business Profile as your action step.
Select Create Reply as the action event.
Connect your Google Business Profile account (same as Zap 1).
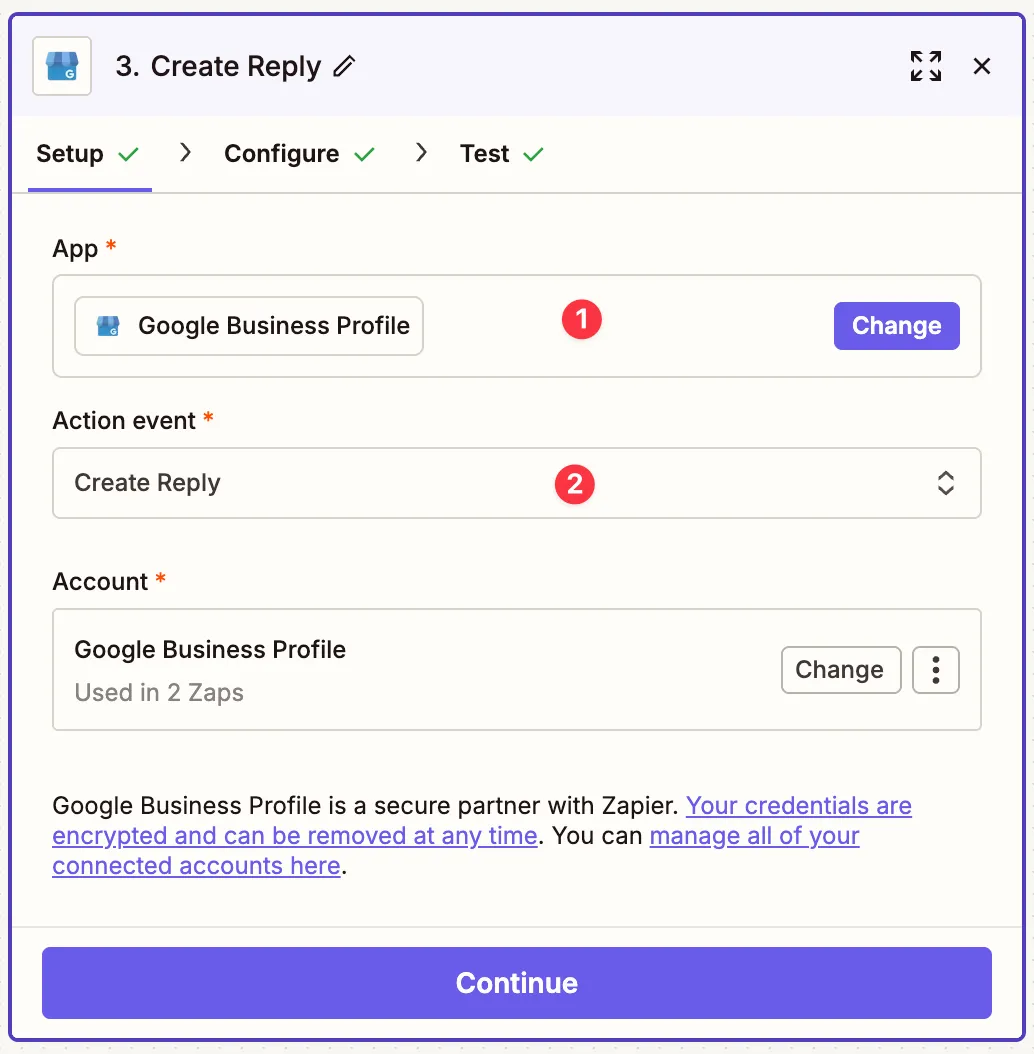
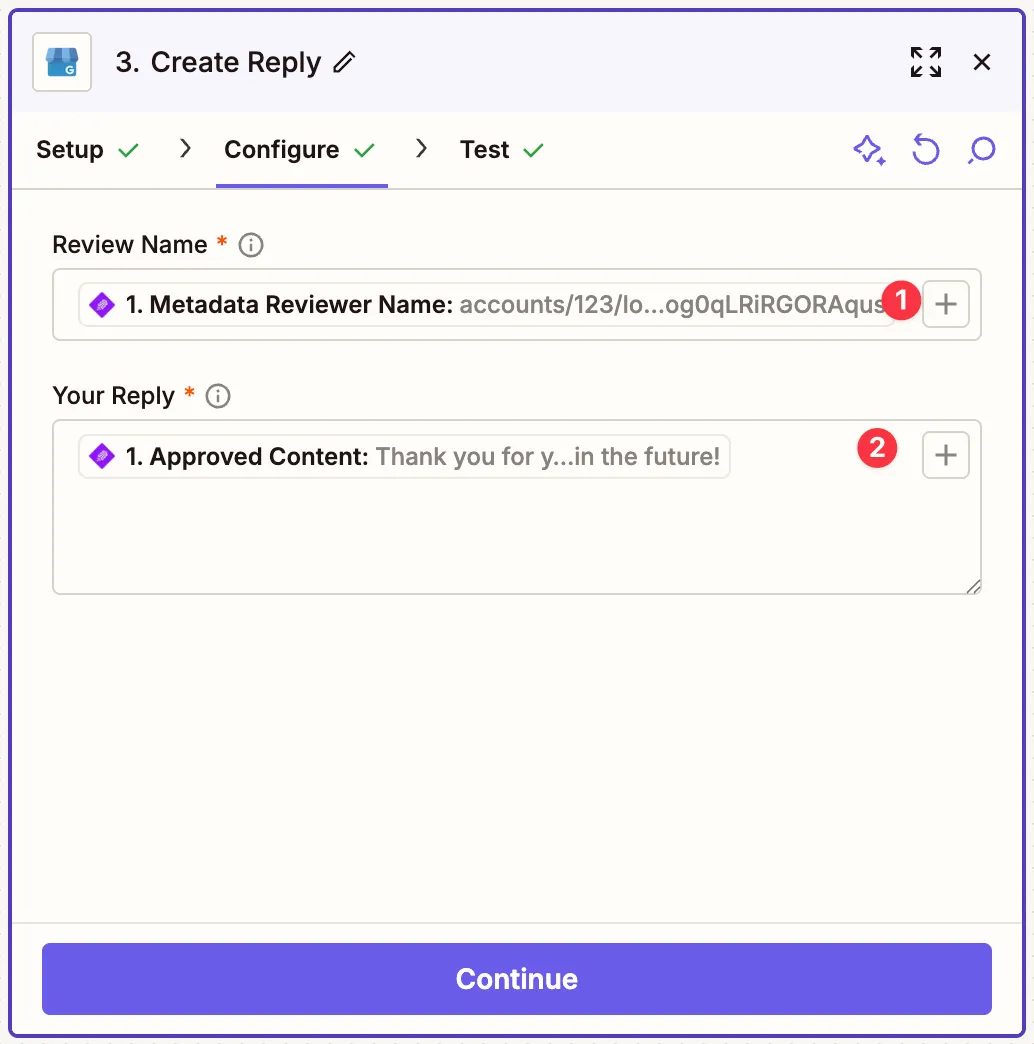
Configure the reply:
-
Review Name: Map
1. Metadata Reviewer Namefrom the trigger- This is the unique identifier for the review in Google’s system
-
Your Reply: Map
1. Approved Contentfrom the trigger- This contains the final, human-approved response text
Test this step to ensure the reply posts correctly.
Turn on your Zap once testing is successful.
Advanced Customization Ideas
Section titled “Advanced Customization Ideas”Once you have the basic automation working, consider these enhancements:
1. Sentiment-Based Routing
- Add a sentiment analysis step
- Route negative reviews to senior staff
- Auto-approve very positive, simple reviews
2. Response Templates
- Create different AI prompts for different star ratings
- Use Zapier Paths to route to different prompts
3. Multi-Location Support
- Add location as metadata
- Route reviews to location-specific managers
- Use location-specific brand voice in prompts